
Note
If you do not have vendor account number, you may leave the Account Nbr text box blank
Allows you to view information about your vendors/manufacturers.
Click on Vendors from the left hand menu.

Allows you to view information about Sales Reps on your team. And manage your profile, Vendor Account Numbers
Click on Reps from the left hand menu

To edit your Profile, click on the Edit button.
To edit your Vendor Account Numbers, click on the Vendor Acct Nbrs button.
This will show you your profile, and allow editing.

Enter info, and click Save button.
To Edit Notifications, click on the Notifications Tab at top.
This will show you your Notifications set up, and allow editing.

Select the emails and options you wish to receive.
Click the Save button.
This will show you each of your vendors, and allow entering your account number for them.

Enter your account number for each vendor.
Click the Save button.
If you do not have vendor account number, you may leave the Account Nbr text box blank
Click on Customer List from Customers drop down, in left hand menu.

To search for a customer, enter search term in Search text box and click Search button. Check Include Inactive Accounts, to include all accounts.
You may enter any part of customer name, city, state, phone, buyer name to search for a customer.
To Add New Customer, click on the Add New Customer Button.
To Export Customer list to excel, click on the Export button.
To Edit Customer, click on the Edit button.
To copy this customer to another Rep Group, click on the Copy button.

Fill out info for customer.
| 1) Bill-To | Select Bill-To from drop down, select "None" if this customer has no Bill-To. |
|---|---|
| 2) Vendor Email | This will be email address displayed on orders sent to vendors. |
| 3) Status | Use this drop down to mark customer as active or in-active. |
| 4) View Map | View Map with customer plotted on map. |
To Save customer info, click on the Save Button.
To Start another new customer, click the Add New button
To Edit Buyers, click on the Buyers Tab at top.
To Edit Vendor Account #s Info, click on the Vendor Tab at top.
To View customer Order History, click on the Order History Tab at top.
To Edit Call Log, click on the Call Log Tab at top.

You may have up to 4 different buyers for a store.
Select Buyer Type from dropdown list. And enter Buyer name, phone, and email.
Click the Invite button to send email to Buyer to set up account for Retail Store Web Site.
To Save Buyer info, click on the Save Button.

Enter each vendor's account for this account.
Click the Allow check box, to allow this vendor to be seen and used in the Retail Store Web Site for this account.

Click Download button, in Action column to download copy of this order.

This will list all calls made to a store.
To Add new Call, click on the Add Call Button.
Make sure to enter Follow up Date, so call will display in Follow Up Calls page
to alert you when to make next call to store.
Once the call has been followed up on, click the Mark Follow Up button
You can clear a followed up status on a call by clicking the Remove Follow Up button
Click on Bill-To List from Customers drop down, in left hand menu.

To search for a Bill-To, enter search term in Search text box and click Search button.
You may enter any part of Bill-To name, city, state, phone to search for a Bill-To.
To Add new Bill-To, click on the Add New Bill-To Button.
To Edit Bill-To, click on the Edit button next to Bill-To to edit.

Fill out info for Bill-To.
To Save Bill-To info, click on the Save Button.
To Start another new Bill-To, click the Add New button

View and manage all calls that need followed up on for date range at top of page.
After you make the follow up call, click the Mark Follow up button, to show the called as followed up.
| 1) Search Button | Enter custom date range to search for. |
|---|---|
| 2) Current Week Button | Display all follow up calls for current week. |
| 3) Next Week Button | Display all follow up calls for next week. |
| 4) Add New Call Button | Add a new call for any store. |
You may enter new calls for any store from here, without going to the Customer Maint. Call log page
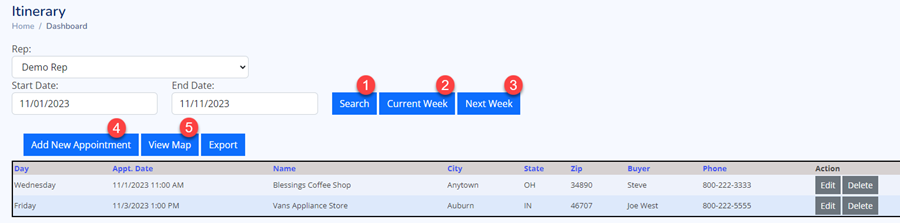
Itinerary is for managing your store appointments.
| 1) Search Button | Enter custom date range to search for. |
|---|---|
| 2) Current Week Button | Display all Store Appointments for current week. |
| 3) Next Week Button | Display all Store Appointments for next week. |
| 4) Add New Appointment | Add a new Appointment for any store. |
| 5) View Map | View map with all appointments plotted on map. |
Click on Item List from left hand menu.

Select vendor from Vendor drop down
To search for an item, enter search term in Search text box and click Search button. Check Include Inactive Items, to include all items.
You may enter any part of item sku, description, upc code, isbn to search for an item.
To View Item, click on the View button next to item to view.

To view larger image, click on the item image.
To view Advance Pricing (including Qty Break prices), click Advance Pricing button
Click on Order List from Orders dropdown in left hand menu.

Select vendor from Vendor drop down, to view orders for a vendor.
To search for an order, enter search term in Search text box and click Search button.
You may enter any part of Order number, PO Number, customer name, city, state to search for an item.
To Add New Order, click on the New Order button.
To Edit Order, click on the Edit button next to the order you wish to edit.
To Download copy of order, click on the Download button next to the order you wish to edit.
You can download order in either PDF or Spreadsheet formats.
To view Orders on Hold, click on the View Hold Orders button.
Mfg Comments
The Mfg Comments Green button indicates there is a new vendor comment to view.
When button is Red, this indicates there is an Urgent vendor comment to view.
After viewing the vendor comment, the button will be gray.
Click View Comments button to view the comments.
| Ready To Send | Order is ready to send to venor. |
|---|---|
| Sent | Order has been sent to vendor. |
| Hold | Order is placed on Hold. And will not be sent to vendor |
| Mark as Sent | Order is Marked as Sent to vendor, will not send to vendor. Use this for orders you just want a record of order but will not send to vendor. |
| Not Sent | Order has not been sent to vendor yet. |
|---|---|
| Sent | Order has been sent to vendor, but vendor has not viewed order yet. |
| Received | Order has been viewed by vendor. |
Click on Add Order from Orders dropdown in left hand menu, or Add Order button from Order List

| 1) Select Vendor | Select vendor from dropdown. |
|---|---|
| 2) Find Customer | Start typing customer name, and list of customemrs will display. Click on customer from dropdown. |
| 3) Save Order | Save order anytime by clickig Save button |
| 4) Find Items | Start typing sku or description, and select item from dropdown of items then tab to qty field and enter order qty. Qty will default to Min Order Qty |
| 5) Add Item | Click Add Item to add item to order. |
You may Add a new customer by clicking the Add Customer button.
After saving a new order, you can click New Order button, to enter new order for same store
and the orders will be tied together by the session number.
Or click New Session button, to start a new order for a new store under new session number.
To use an order form, click Order Form button.
and list of orders form for this vendor will be listed.
Select the order form, and click Add Order Form button. And items from order form will be automatically added to order.
Click Here to see how to enter new order forms
Click Print... buton to view Order Copy. On Preview page, you can print or save order to a PDF.

| 1) Item Text Box |
There are 2 options for entering Item Numbers. 1) Start Typing sku, description, upc and drop down of matching items will display. Select item in dropdown, Hit Enter key twice to add item to order with Min Order Qty Or hit tab key to move cursor to qty text box to change qty, then hit enter key. 2) Scan Bar Code with sku or upc code This will add line to order with Min Order Qty |
|---|---|
| 2) Qty Text Box | Qty will default to Min Order Qty. You can change qty, then click enter key to add item to order. |
| 3) Add Item Button | Click Add Item button to add item to order. |
Click Here to view Bar Code Scanner Help Doc
To remove an item from order, click the Delete button next to the item you wish to delete.
To Hold an order (Held orders will not send), Edit the order you wish to put on Hold.

Check the "Hold" check box.
Click Save button, to save changes to order.
To Mark an order as sent, Edit the order you wish to put Mark as Sent.

Orders Marked as Sent, will not send to vendor, but will be include in Sales Reports.
Check the "Do Not Send" check box.
Click Save button, to save changes to order.
Click on Send Orders from Orders dropdown in left hand menu.
If you have an order you not want to send yet, you will need to put it on hold.

Only orders in "Ready to send" status are available to send. Held orders and Mark as sent orders will not send.
Click Send Button next to vendor and orders you wish to send.
Slide out will display, with options for sending.

Check boxes to Send to Vendor, Send to Store, Send to Rep.
You may enter short message to be included in email order copy.
Click Send Orders button, to send the orders.
Click on Order Forms from Orders dropdown in left hand menu.

Select Vendor from drop down, to view orders forms for this vendor.
Click on Add Order Form to add new Order Form
Click on Edit button, next to Order Form you wish to edit
Click Include Shared Forms, to include shared forms.
Shared Forms can be used by all reps in your group.

Fill out info for order form.
To Save Order Form info, click on the Save Button.
To Start another new Order Form, click the Add New button
Start typing sku or description, and select item from dropdown of items
then tab to qty field and enter order qty.
Qty will default to Min Order Qty

When orders are placed by customer in the B2B Retail Store Web Site, you will receive an email that order has been placed.
In SRP, click on the Customer Orders menu option to see list of all orders that need SRP order created from the customer order.
Next, click on Create Orders button, next to the customer order you want to create SRP orders for.
If customer sent POs for multiple vendors, you will each vendor's order separate, with separate Create SRP Order buttons

Review the order that customer sent.
You can change the PO, Dates, Ship via, Terms, and Discount. Items can also be removed, or quantities changed.
Click the Create SRP Order button to create the SRP order.
When the order is created, you will see the new SRP Order Number.

Go to your normal Order List page, and the new order will be in list as a nomral SRP order. This order is ready to send to Vendor.